By default, every Google device uses the following configured DNS-servers:
8.8.8.8
8.8.4.4
But I don’t want my guests, who can use my WiFi, to let Google phone home and give information about who visits my network.
I use iptables to block those DNS-requests. The firewall rejects all the DNS-requests that would be sent to Google. So the clients have no other option than to use the DNS-server that’s published by my DHCP-server.
User scripts
With the AsusWRT (and asuswrt-merlin) firmware I can add user scripts. The next two lines are loaded when the firewall (iptables) has been started.
Save this code in the folder /jffs/scripts/ with the filename firewall-start.
After successfully loading the rules in iptables, when your router has (re)booted successfully, every DNS-request to Google will be rejected. When testing this with a ping to 8.8.8.8 (or 8.8.4.4), the result should be:
Pinging 8.8.8.8 with 32 bytes of data:
Reply from 192.168.2.1: Destination port unreachable.
Reply from 192.168.2.1: Destination port unreachable.
Reply from 192.168.2.1: Destination port unreachable.
Reply from 192.168.2.1: Destination port unreachable.
Probleem met PowerShell: het kan geen strings aan die langer zijn dan 255 tekens. Mijn DKIM-key is langer dan dat, en ondanks allerlei pogingen is het niet gelukt om deze met PowerShell toe te voegen aan de DNS-zone.
Gelukkig werkt dnscmd nog wel in PowerShell, dus kan ik met onderstaande code alsnog dit type TXT-records aanmaken.
Belangrijk is dat er een spatie tussen de aanhalingstekens wordt geplaatst. Dan wordt de tekst op een nieuwe regel geplaatst in de DNS-zone.
Het toevoegen van een reservering
Ik draai PiHole met een uitgebreide lijst, maar daardoor worden een aantal services geblokkeerd die ik op mijn Philips Smart TV graag wel wil gebruiken.
Om het mogelijk te maken dat deze een andere DNS-server toegewezen krijgt, maak ik eerst een reservering voor de TV:
Na twee jaar met de Experiabox v8 te hebben gewerkt in combinatie met een Telfort Glasvezel abonnement, is het tijd om deze te vervangen. Ter vervanging van de Experiabox v8 heb ik de ASUS RT-AC68U aangeschaft.
Het belangrijkste is dat internet en IPTV blijven werken. Ik maak geen gebruik van telefonie, waardoor VOIP niet in deze uitleg wordt meegenomen.
Nu ben ik niet de eerste die de waardeloze Experiabox v8 wil vervangen, dus er zijn genoeg fora te vinden waarop wordt uitgelegd hoe je de router moet inrichten om te zorgen dat het probleemloos werkt.
Deze instructie is gebaseerd op dit forumthread van Tweakers
VLAN’s
Telfort heeft – net als KPN – het netwerk opgedeeld in VLAN’s. Hierdoor kan het meerdere diensten over één verbinding aanbieden, zonder dat deze last hebben van elkaar.
Telfort gebruikt de volgende VLAN’s:
4 – IPTV
7 – VOIP (wordt niet gebruikt in deze handleiding)
34 – Internet
De ASUS router gaat straks deze verschillende VLAN’s scheiden en zorgen dat het netwerkverkeer op de juiste plek terecht komt.
Routed vs Bridged
Het is mogelijk om op twee manieren de verbinding voor internet en IPTV in te stellen.
Bridged
In Bridged mode configureer je de router via de webinterface. Daarin wordt ingesteld welk VLAN voor het internet is en welke voor IPTV. De router zorgt ervoor dat het juiste VLAN aan een poort wordt gekoppeld.
In Bridged mode werken niet alle functies op de settopbox die Telfort meelevert. Zo werkt On Demand niet, en Apps op TV is ook niet te gebruiken.
Dit wordt niet gebruikt.
Routed
In Routed mode configureer je de router voornamelijk via de CLI d.m.v. een SSH-verbinding of Telnet.
In Routed mode krijgt de settopbox een IP-adres van de DHCP-server in het netwerk, en zorgt de router ervoor dat het verkeer van IPTV wordt gescheiden van het internetverkeer.
Hierdoor kan de settopbox verbinding maken met diensten die niet via het VLAN van IPTV wordt aangeboden. Zo werkt via Routed mode de eerder genoemde On Demand en Apps op TV zonder problemen.
Configuratie van ASUS RT-AC68U
Webinterface
Het eerste deel van de configuratie vind plaats in de webinterface van de router. Open daarvoor de webinterface van de router.
Navigeer naar LAN > IPTV
Selecteer bij ISP Profile: Manual Setting
Vul bij Internet het VID 34 in, en bij PRIO 1
Selecteer bij Use DHCP routes: RFC3442 & Microsoft
Selecteer bij Enable multicast routing (IGMP Proxy): Enable
Selecteer bij Enable efficient multicast forwarding (IGMP Snooping): Enable
Klik op Apply
MAC-adres wijzigen
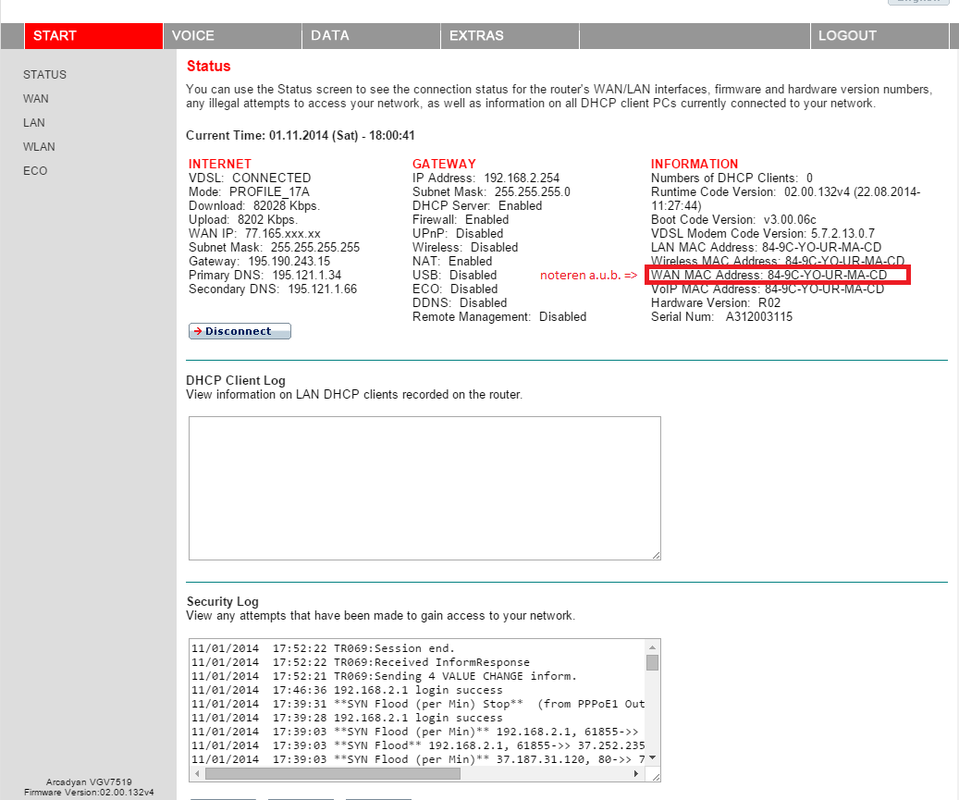
De Experiabox heeft verschillende MAC-adressen. Die worden gebruikt voor de verschillende onderdelen. Het MAC-adres wat nodig is voor de internetverbinding is die van het WAN MAC Adress.
Je vindt het MAC-adres van de Experiabox door in te loggen op de webinterface, rechts onder het kopje INFORMATION.
Afbeelding van https://experiabox-bridge-modus.weebly.com/. Het gaat om het MAC Address wat in rood gekaderd is.
Om het MAC-adres van de Experiabox mee te sturen op de internetverbinding van de ASUS router:
Ga naar WAN
Plaats bij MAC Address het MAC-adres van de Experiabox. Vervang de streepjes voor :, anders zal de router het adres niet accepteren.
Klik op Apply
SSH activeren
De bestanden zijn het eenvoudigst op de router te plaatsen d.m.v. een SSH-verbinding. Standaard staat SSH uitgeschakeld. Zo schakel je SSH in:
Ga naar Administration > System
Selecteer bij Enable SSH: LAN only
Klik op Apply
Bestanden overzetten via WinSCP
Nu is het tijd om de bestanden – hier te downloaden – over te zetten. Het gaat om verschillende bestanden in verschillende mappen, in de map /jffs/.
.asusrouter (bestand)
configs (map)
igmpproxy.conf (bestand)
dnsmasq.conf.add (bestand)
scripts (map)
services-start (bestand)
vlan4.script (bestand)
De bestanden zijn geconfigureerd voor de ASUS RT-AC68U. Je hoeft niets aan te passen om het werkend te maken.
IP-instellingen
Deze handleiding gaat ervan uit dat het netwerk 192.168.1.0 met subnet 255.255.255.0 wordt gebruikt. Dit is standaard.
Indien het subnet waarin de ASUS RT-AC68U wordt geplaatst groter of kleiner is, dan moet het broadcastadres in dnsmasq.conf.add gewijzigd worden naar het juiste broadcastadres.
Anders kan de settopbox na uitschakeling geen verbinding meer tot stand brengen.
Scripts uitvoerbaar maken
Om de scripts uitvoerbaar te maken dienen de permissies gewijzigd te worden. Gebruik hiervoor het commando chmod.
Zorg dat de permissies overeenkomen met onderstaande tabel.
Bestandsnaam
Permissie
.asusrouter
0555
services-start
0755
vlan4.script
0755
Testen
Nu is het tijd om te testen of de instellingen goed zijn geconfigureerd.
Checklist
Controleer of de VLAN voor Internet goed is ingevuld in de webinterface
Controleer of alle bestanden in de juiste mappen staan
Controleer of de permissies goed zijn ingesteld
Herstart de router en houdt de logs goed in de gaten. Je vindt de logs bij System Log.
Afronden
Als blijkt dat alles goed werkt, dan is het tijd om SSH weer uit te schakelen. Open de webinterface
WordPress saves all kinds of information when someone leaves a comment on your blog/website. Two pieces of information I don’t need from someone who comments on an article are the IP-address of the author and the User Agent of the browser they used to place the comment.
pre_comment_* hooks
WordPress has pre_comment_* hooks which can be used to alter data before it’s put into the database.
This hook filters the comment author’s IP before it is set, so this can be used to alter the IP-address before it’s saved in the database.
// Don't log IP addresses of comment authors.
add_filter( 'pre_comment_user_ip', '__return_zero' );
The filter uses the function __return_zero, which does exactly as it says: the comment_user_ip is set to 0.
Clean up already saved IP-addresses
To clean up the already saved IP-addresses, you execute the following SQL-query (after you made sure you have made a full backup of the database) via phpMyAdmin to your WordPress database:
update wp_comments set comment_author_IP ='' ;
pre_comment_user_agent
This hook filters the comment author’s browser user agent before it is set, so this can be used to alter the User Agent before it’s saved in the database.
// Don't log User Agents of comment authors.
add_filter( 'pre_comment_user_agent', '__return_empty_string' );
The filter uses the function __return_empty_string, which returns an empty string before the data is saved into the database, thus keeping the database clean from unneeded information.
Clean up already saved User Agents
To clean up the already saved User Agents, you execute the following SQL-query (after you made sure you have made a full backup of the database) via phpMyAdmin to your WordPress database:
First, browse to the folder in which you want to delete files with a specific extension
cd /path/to/folder
Then delete the files with the extension .jpg
find . -type f -iname \*.jpg -delete
. tells to start searching in the current folder.
-type f tells find only to look for files.
-iname makes the search case insensitive.
-delete tells find to delete/remove all files found.
Change .jpg with the file extension you want to delete from a folder. I recommend running the command without -delete first to get a list of the files that will be removed when -delete is included in the command. This way a small typo won’t delete anything you didn’t intend to.
Ik ben constant bezig om mijn weblog over fotografie te verbeteren. Vandaag had ik weer een nieuw idee: bij elke uitgaande link wil ik een icoontje wat aangeeft dat het een externe link is. Daarvoor moet ik verschillende CSS selectors gebruiken om het gewenste doel te bereiken.
Na zoeken kwam ik op de volgende code uit:
a[href]:not([href*="maartenvandekamp.nl"])::after
Wat deze code doet is zoeken naar het element href, een attribuut van a, en als de href GEEN (vandaar not() ) maartenvandekamp.nl bevat, dan moet er een icoontje achter. Maar hij pakte alle links waar geen maartenvandekamp.nl in zat, ook links die wel intern waren maar een href van /stel-een-vraag/ hadden.
Dat was niet de bedoeling.
Specifieker zijn
Ik moest specifieker zijn en aangeven in welke class hij deze selector uit moest voeren: de class .entry-content, waarin de tekst van het artikel staat en .comment-content, de class waarin de tekst van de reactie staat. Uiteindelijk is het de volgende code geworden:
I’m using an internet connection from an ISP called Telfort, and this week my public IP-address suddenly changed (without notice) which left me unable to receive email for 6 hours. Sadly, it’s not possible to get a static ip-address with this ISP.
To prevent future downtime I searched for a program that sends an email when my public IP-adress changes. I found an PowerShell script that fulfills all my needs.
This script checks the response every hour from the website ( the response is my external IP-address, generated with simple PHP code ). It checks whether the external IP is still the same as the one in the file ip.txt.
When it’s changed, an email is send to the user(s) that are defined in the .ps1 file. Of course, this is another email address then the one I host at my mail server at home.
The difference with the previous code is that this code only retrieves the ID’s from the related tags, where the previous code retrieved all the information from the tags, to use only the ID from the array.
The code is cleaner and does not use any if anymore