cmd /c dir /s /b /a |? {$_.length -gt 250}CasaKampa Blog
Niets is zo permanent als een tijdelijke oplossing.
-
-
This text is a copy of this post on Reddit, for archiving purposes:
- Download the KVM (qcow2) disk from here
- Copy it to your Proxmox server (you can do this with
scp) - Expand the xz file with
unxz
Create a new VM
- Enter the Proxmox GUI and Create a new VM
- Set up as you usually would, but remove all SCSI devices. Set BIOS to UEFI!
Import the disk
- SSH into your Proxmox instance
- Run
qm importdisk <VMID> /path/to/qcow2 <STORAGE> --format qcow2(replace<VMID>with the ID of your new VM (eg: 123), and<STORAGE>with the name of your chosen storage in Proxmox (eg:local-lvm).) - Run
qm set <VMID> --scsi0 <STORAGE>:<DISK-NAME>(you can find this info in the output of the previous command (eg: `local-lvm:vm-123-disk-0).) - In the Proxmox GUI, create a new EFI Disk for the VM, and disable “Pre-Enroll Keys”
Now you can boot the VM and see a brand new installation of Home Assistant OS!
-
There are several ways to update Docker containers. You can use Portainer or Watchtower, but if you only have a few containers running, you can also do it via the CLI.
These steps assume that a
(docker-)compose.ymlfile is in/dockerdirectory and that the Docker Compose plugin is installed.Login the Docker host
ssh user@hostNavigate to the directory
cd /docker/Stop running containers
docker compose downUpdate the containers
docker compose pullPrune unused images
docker image pruneConfirm with Y and press Enter
Start the containers
docker compose up -dCheck running containers
docker ps -
I use a Samsung Portable SSD T7 for offline backups of containers and VMs. It is formatted with the exFAT filesystem, making it readable by multiple operating systems.
This guide requires basic Linux knowledge and is intended for occasional backups, as there are better solutions than backing up to portable SSDs.
Mounting the portable USB drive in Debian
- Open the shell via the Proxmox webinterface or login via SSH
- List the current attached SCSI, SATA, or USB drives:
ls -l /dev/ | grep sd - If the command output is not empty, it will list the connected drives and partitions:
sda
sda1
sda2
sda3 - Attach the portable SSD to the computer on which Proxmox is running
- Check if the portable SSD is correctly detected by Proxmox:
lsusb - The portable SSD should be visible in the results:
Bus 002 Device 002: ID 04e8:61fb Samsung Electronics Co., Ltd PSSD T7 Shield - Create a local directory which will be used to mount the portable SSD:
mkdir -p /root/ssd/ - List the current attached disks again, to verify which disk has the partition we want to mount into the local folder:
ls -l /dev/ | grep sd - If the command output is not empty, it will list the connected drives and partitions:
sda
sda1
sda2
sda3
sdb    < Samsung Portable SSD
sdb1 < exFAT partition - Mount the exfat partition
sdb1into the local folder/root/ssd/:mount /dev/sdb1 /root/ssd/ - Create a folder called
proxmox_backup:mkdir -p /root/ssd/proxmox_backup/
Add the portable USB drive as a backup target in Proxmox
- In the webinterface of Proxmox, click on Datacenter > Storage > Add > Directory
- Enter the following information:
ID: SamsungT7
Path: /root/ssd/proxmox_backup/
Content: select Disk image and VZDump backup file - Click Add
- A new entry should be added with the ID you entered
Create a backup of a container or virtual machine
I prefer to back up containers and virtual machines that are shut down to ensure no changes are made during the backup process.
Repeat the steps for every container or virtual machine you want to back-up.
- Select the container or virtual machine you want to back-up
- Shutdown the container or virtual machine
- Click Backup in the vertical toolbar
- Click Backup now
- Make sure the settings are:
Storage: SamsungT7
Mode: Stop - Click Backup
- When the backup is successfull, start the container or virtual machine
Remove the portable USB drive as a backup target in Proxmox
Ensure all backups are finished before proceeding with these steps:
- In the webinterface of Proxmox, click on Datacenter > Storage > SamsungT7 > Remove
- Confirm with Yes
Unmount the portable USB drive in Debian
- Open the shell via the Proxmox webinterface or login via SSH
- Go to the root of the filesystem:
cd / - Unmount the portable USB drive
umount /root/ssd/ - Check if the partition
sdb1is really unmounted – the result should be empty:df -h | grep sdb - Remove the portable SSD from the computer in which Proxmox is running.
- Store the portable SSD somewhere safe
-
This guide is based on my experience flashing the firmware of an Electrolama ZZH! dongle. It should work with every Zigbee dongle that is supported by the Z-Stack-firmware.
These steps are based on information and tools from these sources:
- https://github.com/Koenkk/Z-Stack-firmware
- https://support.electrolama.com/radio-docs/flash-cc-bsl/
- https://github.com/zigpy/zigpy-znp/blob/dev/TOOLS.md#backup-and-restore
Ubuntu Live
We use a live install of Ubuntu Desktop on an USB-drive. Download the ISO and use a tool like Rufus or BalenaEtcher to flash the ISO onto the USB-drive. Boot the device from the USB drive, ensure you are on the desktop, and confirm you have a working internet connection before proceeding.
Preparations
Before we can flash the new firmware onto the dongle, we first need to download the new firmware and install some Python modules. This way, we can backup the current configuration, flash the firmware and then restore the backup into the new firmware.
Download new firmware
First, consult this page to find which firmware you need for your Zigbee dongle: https://github.com/Koenkk/Z-Stack-firmware/blob/master/coordinator/Z-Stack_3.x.0/bin/README.md
After finding the correct version, download the compatible Z-Stack firmware from KoenKK’s GitHub: https://github.com/Koenkk/Z-Stack-firmware/tree/master/coordinator/Z-Stack_3.x.0/bin
Extract the correct
.hexfile from the zip-file into/home/ubuntu/Download cc2538-bsl
Open the terminal and make sure you are in
/home/ubuntu/. Then type the following command:wget -O cc2538-bsl.zip https://codeload.github.com/JelmerT/cc2538-bsl/zip/master && unzip cc2538-bsl.zipInstall python-pip
The next steps are all executed in the terminal in the folder /home/ubuntu/ as root:
Open the terminal and insert the following:
sudo -sYou should now see
root@ubuntu:/home/ubuntu#We need
pipto install other packages, therefore we install this one first:apt install python3-pipBecause it’s a live install, things can get broken when installing packages via
pip. The following message will appear when trying to install new Python modules:error: externally-managed-environment × This environment is externally managed ╰─> To install Python packages system-wide, try apt install python3-xyz, where xyz is the package you are trying to install. If you wish to install a non-Debian-packaged Python package, create a virtual environment using python3 -m venv path/to/venv. Then use path/to/venv/bin/python and path/to/venv/bin/pip. Make sure you have python3-full installed. If you wish to install a non-Debian packaged Python application, it may be easiest to use pipx install xyz, which will manage a virtual environment for you. Make sure you have pipx installed. See /usr/share/doc/python3.11/README.venv for more information. note: If you believe this is a mistake, please contact your Python installation or OS distribution provider. You can override this, at the risk of breaking your Python installation or OS, by passing --break-system-packages. hint: See PEP 668 for the detailed specification.But it’s necessary that we install these packages, so we use an option to override this warning:
pip install zigpy-znp intelhex pyserial --break-system-packagesWhen these packages are installed, it’s time to back-up the current configuration:
python3 -m zigpy_znp.tools.network_backup /dev/serial/by-id/... -o zigbee_backup.jsonNext, it’s time to update the firmware:
python3 cc2538-bsl.py -p /dev/serial/by-id/... -evw NEW_FIRMWARE.hexWhen this is done, it’s time to restore the backup into the new firmware:
python3 -m zigpy_znp.tools.network_restore /dev/serial/by-id/... -i zigbee_backup.jsonIf everything went well, your Zigbee dongle should now be running the new firmware, making your network more stable, responsive, and secure.
-
I have a Synology DS214 NAS in my network. A folder on the NAS was shared via NFS. Connecting to this shared folder with NFS version 3 worked fine in VMware ESXi 8.0, but I was unable to get access to the folder using NFS version 4.1. Newer models may support NFS version 4.1 out of the box., check your settings.
While searching for a solution, I found that in my case the configuration of NFS had to be changed on the Synology DS214 NAS. By default it allows NFS version 4, but not NFS version 4.1.
By following these steps, it is possible to add the Synology NFS datastore to VMware ESXi 8 using NFS version 4.1:
- Enable SSH in Synology DSM
- Login to SSH with your admin credentials
- Type
sudo -ito become root - Navigate to /etc/nfs/:
cd /etc/nfs/ - Edit the file syno_nfs_conf:
vi syno_nfs_conf - Press Insert on your keyboard and change the value of nfs_minor_ver_enable from 0 to 1
- Press Escape, type
:wq!and then press Enter - Restart the NFS service:
systemctl restart nfs-server - Log out of SSH by typing
exittwice - Mount the NFS Datastore in VMware ESXi
You should now be able to add the NFS share as a datastore to your VMware ESXi server.
Based on these instructions: VMware ESXi mount a NFS share on a Synology Diskstation
-
Vanwege een nieuw internetabonnement ben ik met ingang van 31 oktober 2020 door KPN overgezet van het Telfort netwerk naar het KPN netwerk. Dit betekende onder andere het omschakelen van DHCP naar PPPoE om verbinding te kunnen maken met het internet.
Mijn uitdaging: IPv6 zonder al te veel moeite werkend krijgen.
Let op: ik maak geen gebruik van KPN iTV, dus dat wordt buiten beschouwing gelaten in deze post.
Achtergrondinformatie
Voordat ik verder inga op mijn uitdaging, eerst wat informatie. KPN gebruikt VLAN’s om hun diensten over één verbinding aan te bieden, namelijk:
- vlan4: IPTV
- vlan6: Internet
- vlan7: VOIP
Normaal gesproken regelt de door KPN geleverde Experiabox de toegang tot deze diensten voor de apparaten die erop worden aangesloten. Aangezien de Experiabox gemaakt is voor gebruikers die er verder niet naar willen omkijken, is er weinig wat er op het apparaat aangepast kan worden. It just works.
Mijn netwerk en bijbehorende uitdaging
Mijn netwerk
Ik gebruik apparatuur van Ubiquiti in mijn netwerk:
De Unifi Security Gateway kan via de Unifi Network Management Controller worden geconfigureerd, maar daarin kunnen niet alle instellingen worden toegepast om de functies van de Experiabox over te nemen. Dat vereist meer werk.
Er zijn allerlei handleidingen te vinden waarin wordt uitgelegd hoe je door middel van een
config.gateway.jsonbestand de functies van de Experiabox grotendeels kunt overnemen.Mijn uitdaging
Ik wil IPv6 zonder een
config.gateway.jsonbestand te hoeven maken. De Experiabox biedt standaard wél de mogelijkheid om via IPv6 het internet op te gaan, dus dat wil ik ook. In de Unifi Network Management Controller zijn bij de WAN drie mogelijkheden voor IPv6:- Disabled
- DHCPv6 (met Prefix Delegation)
- Static IP
Ik heb gekozen voor DHCPv6 met bijbehorende Prefix Delegation size van 48, maar zonder resultaat: geen IPv6 adres op de WAN.
In mijn zoektocht naar een oplossing kwam ik dit artikel tegen:
En dit blijkt de oplossing te zijn!
Mijn instellingen
Hieronder mijn instellingen in de Unifi Network Management Controller
- Navigeer naar Settings > Networks > LAN > Configure IPv6 Network
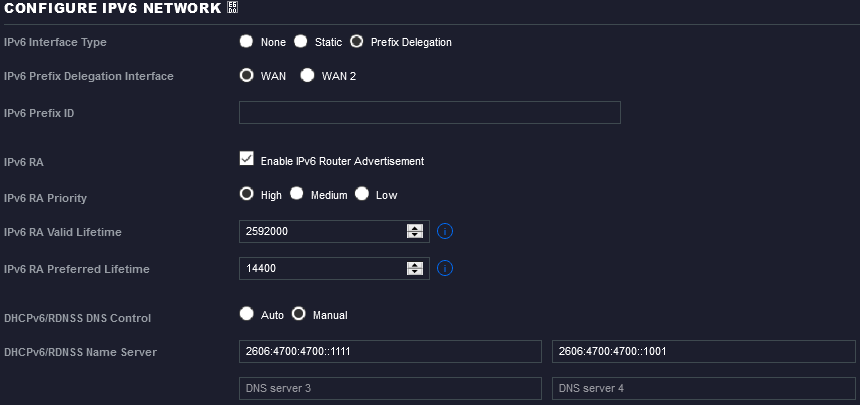
- Nadat deze instellingen zijn ingevoerd klik je op Save.
- Vervolgens ga je naar Devices > USG > tabblad Config > Manage Device + > Force Provision > Provision. Hiermee wordt de Unifi Security Gateway opnieuw voorzien van de instellingen en wordt ook het IPv6 adres opgehaald met bijbehorende informatie.
- Open Powershell / Command Prompt en voer in:
ipconfig - Wanneer alles goed is verlopen, verschijnt er bij de output van ipconfig IPv6 gerelateerde informatie.
-
Om vanuit een eigen mailserver te kunnen mailen vanuit het netwerk van KPN, moet onderstaande toegevoegd worden aan het SPF-record van het verzendende domein:
include:spf.ews.kpnxchange.com
Hiermee worden de mailservers op het domein
kpnxchange.comgeautoriseerd om te mailen namens het verzendende domein. -
When I was looking for something new to build I ended up building a DNS over HTTPS server. This way I can use my Pi-hole server wherever I am, without exposing port 53. I let nginx handle the encryption of the HTTPS connection, send the information to dnsdist for translation to DNS, and let Pi-hole filter the queries using my blocklists.
The following is assumed:
- You have nginx up and running
- You have a subdomain (doh.domain.tld, or dns.domain.tld) with valid certificates (Lets Encrypt, or commercial)
- You have installed dnsdist, but not yet configured it
- You have a Pi-hole server up and running, configured to your wishes
This instruction is based upon this tutorial from nginx.com, which I could not get to work.
https://www.nginx.com/blog/using-nginx-as-dot-doh-gateway
So, that’s why I adopted their configuration to use dnsdist instead of their njs script language.
nginx
The configuration of nginx (saved as dns.domain.nl):
# Proxy Cache storage - so we can cache the DoH response from the upstream
proxy_cache_path /var/run/doh_cache levels=1:2 keys_zone=doh_cache:10m;

server {
    listen 80;
    server_name dns.domain.nl;
    return 301 https://dns.domain.nl/$request_uri;
}

# This virtual server accepts HTTP/2 over HTTPS
server {
    listen 443 ssl http2;
    server_name dns.domain.nl;

    access_log /var/log/nginx/doh.access;
    error_log /var/log/nginx/doh.error error;

    ssl_certificate /etc/letsencrypt/live/dns.domain.nl/fullchain.pem;
    ssl_certificate_key /etc/letsencrypt/live/dns.domain.nl/privkey.pem;

    # DoH may use GET or POST requests, Cache both
    proxy_cache_methods GET POST;

    # Return 404 to all responses, except for those using our published DoH URI
    location / {
        try_files $uri $uri/ =404;
    }

    # This is our published DoH URI
    location /dns-query {

      # Proxy HTTP/1.1, clear the connection header to enable Keep-Alive
      proxy_http_version 1.1;
      proxy_set_header Connection "";

      # Enable Cache, and set the cache_key to include the request_body
      proxy_cache doh_cache;
      proxy_cache_key $scheme$proxy_host$uri$is_args$args$request_body;

      # proxy pass to dnsdist
      proxy_pass http://127.0.0.1:5300;
    }
}
nginx sends an 404 error when you visit the address
https://dns.domain.nl/. It is only a proxy to127.0.0.1:5300when data is sent tohttps://dns.domain.nl/dns-query.Check the configuration of nginx
nginx -t
It should give the following output:
nginx: the configuration file /etc/nginx/nginx.conf syntax is ok
nginx: configuration file /etc/nginx/nginx.conf test is successful
Restart nginx to load the new configuration:
systemctl restart nginx.service
dnsdist
The (minimal working) configuration of dnsdist (saved as dnsdist.conf)
Note: this is a minimal configuration. No measures have been taken with regard to security or abuse. Consult the documentation for more information.
-- dnsdist configuration file, an example can be found in /usr/share/doc/dnsdist/examples/

-- disable security status polling via DNS
-- setSecurityPollSuffix("")

-- fix up possibly badly truncated answers from pdns 2.9.22
-- truncateTC(true)

-- Answer to only clients from this subnet
setACL("127.0.0.1/8")

-- Define upstream DNS server (Pi-hole)
newServer({address="192.168.2.100", name="Pi-hole", checkName="dc01.domain.nl.", checkInterval=60, mustResolve=true})

-- Create local DOH server listener in DNS over HTTP mode, otherwise the information coming from nginx won't be processed well
addDOHLocal("127.0.0.1:5300", nil, nil, "/dns-query", { reusePort=true })
A few things are important here:
- I’ve set an ACL that allows dnsdist to only answer to queries from the subnet
127.0.0.1/8. - I’ve added an upstream (downstream according to dnsdist) DNS server with the IP address
192.168.2.100. It’s configured with a customcheckNameandcheckInterval. Normally, dnsdist sends a query toa.root-servers.netevery second(!). With this configuration, it checks another server – my domain controller – every 60 seconds. - I’ve added a DOH listener on the loopback address
127.0.0.1:5300. This is configured as DNS over HTTP, because nginx takes care of the decryption of the connection.
Check the configuration of dnsdist:
dnsdist --check-config
It should give the following output:
No certificate provided for DoH endpoint 127.0.0.1:5300, running in DNS over HTTP mode instead of DNS over HTTPS
Configuration '/etc/dnsdist/dnsdist.conf' OK!
Restart dnsdist to load the new configuration:
systemctl restart dnsdist.service
To check if dnsdist is listening to 127.0.0.1:5300:
netstat -tapn | grep 5300
It should give the following output:
tcp 0 0 127.0.0.1:5300 0.0.0.0:* LISTEN 4435/dnsdist
Configuring the browser
Now it’s time to configure your browser to use your new DNS over HTTPS server. This website explains how to configure your web browser to use DNS over HTTPS:
https://developers.cloudflare.com/1.1.1.1/dns-over-https/web-browser/
Final inspection
To make sure it’s working properly, we need to inspect the logs. nginx keeps a log of access and error messages. We will look at those logs to see if the information is passed on correctly to dnsdist.
Take a look at the access logs of nginx:
cat /var/log/nginx/doh.access
It should give the following output:
192.168.2.1 - - [09/Aug/2020:11:55:05 +0200] "POST /dns-query HTTP/2.0" 200 107 "-" "-"
192.168.2.1 - - [09/Aug/2020:11:55:05 +0200] "POST /dns-query HTTP/2.0" 200 107 "-" "-"
192.168.2.1 - - [09/Aug/2020:11:55:05 +0200] "POST /dns-query HTTP/2.0" 200 122 "-" "-"
192.168.2.1 - - [09/Aug/2020:11:55:05 +0200] "POST /dns-query HTTP/2.0" 200 102 "-" "-"
192.168.2.1 - - [09/Aug/2020:11:55:05 +0200] "POST /dns-query HTTP/2.0" 200 125 "-" "-"
192.168.2.1 - - [09/Aug/2020:11:55:06 +0200] "POST /dns-query HTTP/2.0" 200 102 "-" "-"
192.168.2.1 - - [09/Aug/2020:11:55:06 +0200] "POST /dns-query HTTP/2.0" 200 122 "-" "-"
192.168.2.1 - - [09/Aug/2020:11:55:06 +0200] "POST /dns-query HTTP/2.0" 200 125 "-" "-"
192.168.2.1 - - [09/Aug/2020:11:55:08 +0200] "POST /dns-query HTTP/2.0" 200 112 "-" "-"
192.168.2.1 - - [09/Aug/2020:11:55:08 +0200] "POST /dns-query HTTP/2.0" 200 112 "-" "-"
192.168.2.1 - - [09/Aug/2020:11:55:19 +0200] "POST /dns-query HTTP/2.0" 200 140 "-" "-"
192.168.2.1 - - [09/Aug/2020:11:55:19 +0200] "POST /dns-query HTTP/2.0" 200 152 "-" "-"
192.168.2.1 - - [09/Aug/2020:11:55:20 +0200] "POST /dns-query HTTP/2.0" 200 175 "-" "-"
192.168.2.1 - - [09/Aug/2020:11:55:20 +0200] "POST /dns-query HTTP/2.0" 200 137 "-" "-"
192.168.2.1 - - [09/Aug/2020:11:56:15 +0200] "POST /dns-query HTTP/2.0" 200 64 "-" "-"
192.168.2.1 - - [09/Aug/2020:11:56:15 +0200] "POST /dns-query HTTP/2.0" 200 64 "-" "-"
192.168.2.1 - - [09/Aug/2020:11:56:15 +0200] "POST /dns-query HTTP/2.0" 200 64 "-" "-"
192.168.2.1 - - [09/Aug/2020:11:56:15 +0200] "POST /dns-query HTTP/2.0" 200 64 "-" "-"
192.168.2.1 - - [09/Aug/2020:11:56:21 +0200] "POST /dns-query HTTP/2.0" 200 59 "-" "-"
192.168.2.1 - - [09/Aug/2020:11:56:30 +0200] "POST /dns-query HTTP/2.0" 200 55 "-" "-"
It’s important that you see 200 (after HTTP/2.0) in the logs. This means that nginx was able to pass the information to dnsdist. Otherwise, something has gone wrong.
When something has gone wrong, it should show up in the error logs
cat /var/log/nginx/doh.error
It should (hopefully not) give the following output:
2020/08/09 11:15:26 [error] 946#946: *511 connect() failed (111: Connection refused) while connecting to upstream, client: 192.168.2.1, server: dns.domain.nl, request: "POST /dns-query HTTP/2.0", upstream: "http://127.0.0.1:5300/dns-query", host: "dns.domain.nl"
-
I want to receive a notification when someone rings the doorbell at my front door. For this I can buy all kinds of expensive (wireless) doorbells, but I want to use the existing wiring. Because I use Home Assistant for all kinds of automation at home, I also want to integrate this into Home Assistant. Since there is already a Raspberry Pi in the meter cupboard for reading my smart meter, this seemed a logical addition to me.
For this I found this repository: https://github.com/flyte/pi-mqtt-gpio
This Python application does exactly what I want:
- It reads the GPIO pins from the Raspberry Pi Board
- It allows me to configure which pins have to be read
- It allows the Pi to send the information to an MQTT broker
This allows me to use my Home Assistant installation to notify me when someone rang my doorbell, thereby always being informed when someone was at my front door, even when I’m not at home. It also makes it possible to automatically turn on a light in the hallway when it’s dark.
It was a little headache to make it work on my Raspberry Pi 3b with Raspbian, so that’s why I wrote down the instructions.
All the commands are executed as root user
Virtual Env
First you need to create a virtual environment with Python version 3, in
/home/pi/home/pi# python3 -m venv pi_mqtt_gpio
Next, you enter the virtual environment
/home/pi# . pi_mqtt_gpio/bin/activate
Your shell should now show this:
(pi_mqtt_gpio) root@rpi3:Install the following packages with
pip3(if it’s not installed, useapt install python3-pip)- pi_mqtt_gpio
- rpi.gpio
(pi_mqtt_gpio) root@rpi3: pip3 install rpi.gpio pi_mqtt_gpio
In addition, other packages are also installed (enum34, PyYAML, cerberus, paho-mqtt)
Configuration
In the configuration file you define which MQTT broker the data should be sent to, but also to which GPIO pins should be listened.
Read more about the configuration of
pi_mqtt_gpioon this Github page.Note: this tutorial assumes you save the file
pi-mqtt-gpio-config.yamlin the folder/home/piSupervisor
Supervisor is a client/server system that allows its users to monitor and control a number of processes on UNIX-like operating systems.
Install Supervisor
apt install supervisor
Open the Supervisor configuration folder
cd /etc/supervisor/conf.d/
Create a new file with the filename
pi_mqtt_gpio.confnano pi_mqtt_gpio.conf
Add the following lines:
[program:pi_mqtt_gpio]
command = /home/pi/pi_mqtt_gpio/bin/python -m pi_mqtt_gpio.server /home/pi/pi-mqtt-gpio-config.yaml
autorestart = false # added to avoid a restart loop
directory = /home/pi
redirect_stderr = true
stdout_logfile = /var/log/pi-mqtt-gpio.log
Update supervisor to include this program during the startup of the operating system:
supervisorctl update
This should give the following output:
pi_mqtt_gpio: updated process groupNow it’s time to start
pi_mqtt_gpiowith Supervisorsupervisorctl start pi_mqtt_gpio
This should give the following output:
pi_mqtt_gpio: startedCheck the logfile for the correct operation of the program:
tail -f /var/log/pi-mqtt-gpio.log
An example of an working configuration:
2020-04-28 12:06:28,550 mqtt_gpio (INFO): Startup
2020-04-28 12:06:29,039 mqtt_gpio (INFO): Connected to the MQTT broker with protocol v3.1.1.
2020-04-28 12:06:29,049 mqtt_gpio (INFO): Polling: Input 'doorbell' state changed to False
Now you can connect a doorbell to your Raspberry Pi. When you ring the doorbell, a message should be sent to your MQTT broker.